


11
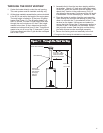
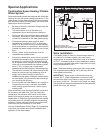
THROUGH THE ROOF VENTING*
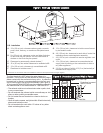
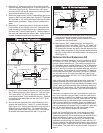
1. Center the heater directly under the roof opening.
This vent system must be installed vertically only.
2. All the pipes needed to assemble the vent are included
in the kit. Do not add to the length of the vent system.
The total height is limited to 15 feet on a 50-gallon
heater (See Figure 11). The 40-gallon heater is 8
and1/4 shorter. The total 15-foot height must stick
through the roof a minimum of 2 feet. If the height
needed is less than 15 feet, determine the height
needed and subtract that from 15 feet. That amount
needs to be cut off one of the 3 pipes and 5 pipes.
Cut the non-flared end of the 3 pipe and the uncrimped
end of the 5 pipe.
3. Assemble the kit from the top down starting with the
termination. Attach a 3 pipe using 4 #8 sheet metal
screws 90
° apart and seal the joint with sealant. Then
attach the 5 section in the same manor. Drill 1/8
pilot holes for the screws. Continue until the full length
is assembled. Put the telescoping 5 section on last.
4. Place the heater in position, feed the vent assembly
down through the roof with the flashing in place, and
allow it to rest with the 3 pipe attached to the 3 vent
terminal on the heater. Use screws and sealant to
secure that joint. Extend the 5 telescoping section to
connect to the 5 termination on the heater. Secure
that joint with screws. Seal that joint and the sliding
joint with silicone to make an airtight assembly.
5. Secure the flashing and vent assembly to the roof.
(*Through the Roof Venting Kit available from manufacturer)
Roof Jack Assembly
8 Ft. Min.
15 Ft. Max
Roof Flashing
Secure All
Connections
with Screws
and Apply
Silicone
Sealant
Figure 11: Through the Roof Venting
2 Ft. Min.
From Any Object
within A 10 Foot
Horizontal Radius