


FAQ'S
Q: How will I know if battery needs to be replaced?
A: Valve does not open and sensor blinks 2 times
interrupted by pause for up to 7 days.
Q: Why has the flow rate of the faucet reduced
significantly?
A: Check and clean aerator and strainer.
Q: There is no flow out of faucet when I'm in the
sensor range?
A: Check sensor. If sensor blinks 2 times interrupted
by pause, replace battery, or call 1800-442-1902.
Q: Why does the faucet operate the opposite of
expected-Turns On when not in sensor range, but
turns off when in sensor range?
A: Sensor wires to solenoid are reversed. Black to -
& Red to + is correct.
Q: What is the normal operating pressure range?
A: Faucet will operate with supply pressures ranging
from 20-80 psi.
CAUTION
GENERAL CLEANING; Fig. 6
1. For general cleaning use a damp, soft cloth to clean
the spout and the sensor.
2. For cleaning dirt use a soft cloth with diluted dish
washing detergent. Wipe the area using a wet cloth
and dry using a soft cloth.
Do not scratch the sensor when cleaning.
Avoid using anything that may scratch the spout
surface. Never use polishing power, detergent or a
nylon scrub brush. They will damage the surface of the
spout or Sensor.
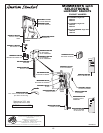
1. Remove ENCLOSURE COVER.
2. Close SUPPLY STOP (5) with 4mm Hex wrench.
Note: Keep water flowing out of faucet while shutting off.
3. Pull off Red (1) and Black (2) CONNECTORS from
SOLENOID VALVE (3).
4. Unthread STRAINER (4) using a 7/16" socket.
5. Pull out the STRAINER (4) and clean with an old
toothbrush. Rinse thoroughly with water.
6. Install the STRAINER (4) back in its place and
tighten with a 7/16" socket.
Caution: do not over tighten strainer.
Note: It is recommended to clean strainer every 6
months.
7. Replace ENCLOSURE COVER. Tighten cover
screws firmly.
1. Remove AERATOR HOUSING (1) with KEY
supplied with faucet.
3. Remove AERATOR (2) from HOUSING (1).
2. Clean the AERATOR SCREENS (3) with a old tooth
brush to remove dirt.
4. Rinse Clean with water. Reassemble and install into
spout end. Be sure black seal washer is in place.
4
4
3
2
1
5
CLEAN
SCREENS
HOW TO CLEAN FILTER; Fig. 4
4
HOW TO CLEAN AND REMOVE
THE AERATOR; Fig. 5
5
6
Fig.4
2
3
8
CAUTION
Before opening ENCLOSURE
disconnect AC power supply.
1
Fig.5
9
M968506
MOMMENTS with
SELECTRONIC
LAVATORY FAUCETS
HOT LINE FOR HELP
For toll-free information and answers to your questions, call:
1 (800) 442-1902
Weekdays 8:00 a.m. to 6:00 p.m. EST
IN CANADA 1-800-387-0369 (TORONTO 1-905-306-1093)
Weekdays 8:00 a.m. to 7:00 p.m. EST
Product names listed herein are trademarks of American Standard Inc.
IN MEXICO 01-800-839-12-00
10
M968506
CHROME 002
Replace the "YYY" with
appropriate finish code
A923672-0070A
FAUCET SUPPLY
HOSE
M962411-0070A
MOUNTING KIT
A913202-0070A
WASHER
M962387-0070A
MOUNTING SCREW KIT
M950250-0070A
DC SOLENOID
VALVE ASSEMBLY
M950251-0070A
AC SOLENOID
VALVE ASSEMBLY
A922272-0070A
U GROMMET
A922251-0070A
SOLID GROMMET
A924162-0070A
SUPPLY HOSE
M962388-0070A
SENSOR KIT
M923827-YYY0A
2.2 GPM AERATOR
066508-YYY0A
0.5 GPM AERATOR
PRODUCT NUMBERS
A922267-0070A
ROUND GROMMET
A923654-0070A
BATTERY 6VCR-P2
A950487-0070A
CIRCUIT BOARD DC
A950489-0070A
CIRCUIT BOARD
AC & MULTI AC
A922290-0070A
POWER SUPPLY
GROMMET
M950169-0070A
POWER SUPPLY
M962389-0070A
SOLENOID & SCREWS
A950507-0070A
FILTER
A950509-0070A
SUPPLY STOP
A918462-0070A
SOLENOID SCREWS
A922265-0070A
10 ft. MULTI EXTENSION WIRE
(for 6057 series only)
A950223-007L0A
SENSOR
DC POWERED; single inlet
2506.155
2506.153
AC POWERED; single inlet
2506.165
2506.162
MULTI AC POWERED; single inlet
2506.175
2506.172