SMOKE ALARM MANUAL
Ionization Type Model - 120 VAC Hardwire
€ Model SA360 - Professional Multi-Location Model 120 Volt
AC Hardwire Smoke Alarm. This model is interconnectable with
up to 11 other units.
Important information about your smoke alarm
€ Install alarms outside of every bedroom area and on every floor of
your home. Please refer to Section 3 •Where to Locate Smoke
AlarmsŽ for details.
€ Test the alarm weekly by pressing and holding the test button for
up to 20 seconds until the alarm sounds.
€
The model described in this manual is designed for single
family residences, including homes and apartments rather than
commercial or industrial use.
Smoke A larm Safety Features
€ Dual-Ionization Chambers - Advanced design responds to visible
or invisible particles of combustion (smoke) to sense fires in their
earliest stages. Compensates for changes in humidity and
temperature to virtually eliminate •nuisanceŽ alarms caused by
normal atmospheric changes in the home.
€ Operating Light (LED) - A continuous green light located behind
the slotted case indicates the smoke alarm is receiving AC power.
€ Interconnection - Interconnection facilities for up to 11 other
units, using only three wires, including AC power. When one
alarm sounds, all properly interconnected smoke alarms follow.
NOTE: Interconnect only with the models specified in Section 6.
€ Alarm Source Indicator - The red operating light in the unit
originating the alarm will flash rapidly in the event of an alarm.
With interconnected units, this feature allows for an easy check to
determine the originator.
€ Locking Key - The auxiliary locking key provided can be used to
lock the smoke alarm to the mounting plate. This helps to reduce
the risk of unauthorized removal.
€ Sensitivity Test Button - Test sensitivity, as well as circuitry and
horn. With interconnected units, activating test button on one
unit will cause all properly interconnected units to sound. An
important and convenient check of system integrity.
€ Quick Disconnect Power Connector - For easy installation,
connect the wires separately from the unit and then plug into the
back of the unit.
€ Detachable Mounting Plate- For easily securing the alarm to the
junction box.
CONTENTS OF THIS MANUAL
1. CAPABILITIES AND LIMITATIONS OF SMOKE ALARMS
2. SAFETY TIPS
3. WHERE TO LOCATE SMOKE ALARMS
4. NFPA RECOMMENDAT IONS
5. LOCATIONS TO AVOID
6. INSTALLATION AND TESTING
7. MAINTENANCE AND T ROUBLESHOOTING
8. LIMITED WARRANTY
9. OTHER AMERICAN SENSORS PRODUCTS
1. CAPABILITIES AND LIMITATIONS OF SMOKE ALARMS
American Sensors smoke alarms are designed to provide early
warning of fire and smoke at reasonable cost. Early warning can
mean the difference between a safe escape and no escape at all.
While smoke alarms can provide invaluable protection for you and
your family, they do have limitations.
€ Smoke alarms cannot work without power. Battery operated
alarms will not work without proper batteries, with dead batteries
or if batteries are not properly installed. AC powered alarms will
not work if their AC power supply is cut off by an electrical fire,
an open fuse, a circuit breaker or any other reason.
If you are concerned about the reliability of either batteries or your
AC power supply for any of the above reasons, you should install
in your home both AC and battery powered smoke alarms for
added security. American Sensors also offers the SA379 model
which is AC powered with battery back-up.
€ Smoke alarms are incapable of sounding the alarm until smoke
reaches the sensing chamber. Anything preventing smoke from
reaching the alarm may delay or prevent an alarm. A smoke alarm
cannot detect fire in the walls, chimney or roof unless and until a
significant amount of smoke reaches the alarm. A closed door may
prevent smoke from reaching an alarm on the other side of the
door. A smoke alarm may not sense a fire on another floor of a
home. For example, a basement smoke alarm may not detect a fire
which started on the first or second floor.
€ Smoke alarms may not be heard. The loudness of the horn in
your alarm meets current standards. However, the sound may be
blocked by distance, closed doors, or ambient noise such as traffic
or a stereo. Smoke alarms may not be heard by persons who are
hard of hearing.
For these reasons, a smoke alarm should be installed in every
room or at least on every level of your home. American Sensors
recommends that hardwire AC Powered smoke alarms be
interconnected, so that one alarm will trigger all other alarms to
sound their alarms.
€ Smoke alarms are not fool-proof. Smoke alarms may not always
sense every kind of fire. T hey cannot be expected to sense fires
caused by carelessness or by safety hazards. They may not give
early warning of fast growing fires caused by smoking in bed,
violent explosions, escaping gas, improper storage of flammable
materials, overloaded electrical circuits, natural causes such as
lightning, children playing with matches, or arson.
€ Smoke alarms are not substitutes for property, disability, life or
other insurance of any kind. Home owners and renters should
continue to insure their lives and property. Consult your insurance
agent.
€ Smoke alarms have limited lives. One or more of the many
components could fail at any time. Therefore, test your smoke
alarm weekly. Clean and take care of it as described in this
manual. Repair or replace the smoke alarm when it fails to test
properly. Your smoke alarm should be replaced if it is ten years
old.
€
A photoelectronic smoke alarm senses smoke using an electronic
photo receptor to sense the scattering of light by smoke particles.
2. SAFETY TIPS
Properly installed and maintained smoke alarms are an essential part
of a good home fire safety program. Your fire safety program should
also include a review of fire hazards and the elimination of
dangerous conditions whenever possible. Consider the following tips:
€ Use smoking materials properly. Never smoke in bed.
€ Keep matches and cigarette lighters away from children.
€ Store flammable materials in proper containers. Never use them
near an open flame or sparks.
€ Keep electrical appliances in good condition. Do not overload
electrical circuits.
€ Keep stoves, fireplaces, chimneys, and barbecue grills grease free.
Make sure they are properly installed and away from any
combustible materials.
€ Keep portable heaters and open flames such as candles away from
combustible material.
€ Do not allow rubbish to accumulate.
€ Keep a supply of extra batteries on hand for your battery powered
smoke alarms.
€ Do not stand too close to the alarm when the unit is in alarm as the
loud horn could damage your hearing.
Never disconnect the battery or the AC power on any type of smoke
alarm to silence a nuisance alarm. Clear the area of smoke by opening
doors and windows or fanning the smoke away.
Most important, when fire strikes, a prepared
and practiced escape plan can make the difference between life and
death. Develop an escape plan and practice it with the entire family,
including small children.
€ Ensure all family members are familiarized with the alarm signal.
€ Prepare an escape plan. Draw a Floor Plan of Your Home and
determine two exits from each room. There should be a way to get
out of each bedroom without opening the door.
€ Have Fire Drills Often. Practice your Escape and BE PREPARED.
€ Decide on a meeting place at a safe distance from your home.
IN CASE OF FIRE
€ Don•t waste time collecting possessions after a fire starts.
€ Arouse all occupants and leave the building. Your most valuable
possession is your life.
€ Doors can mean escape or death. Never open doors without first
checking for heat. Test them with your hands, if they feel warm, fire
may be walled up behind them - leave closed and find another
escape route.
€ Call the fire department from OUTSIDE the building.
€ If trapped inside, stay close to the floor, cover mouth with cloth,
conserve breath as you crawl to safety.
€ Keep all doors and windows closed except for escape purposes.
€ NEVER re-enter a burning building.
€ Keep your family in a pre-arranged meeting place after your escape.
Your local fire department may be able to offer you additional ideas
for safety and escape plans in the home.
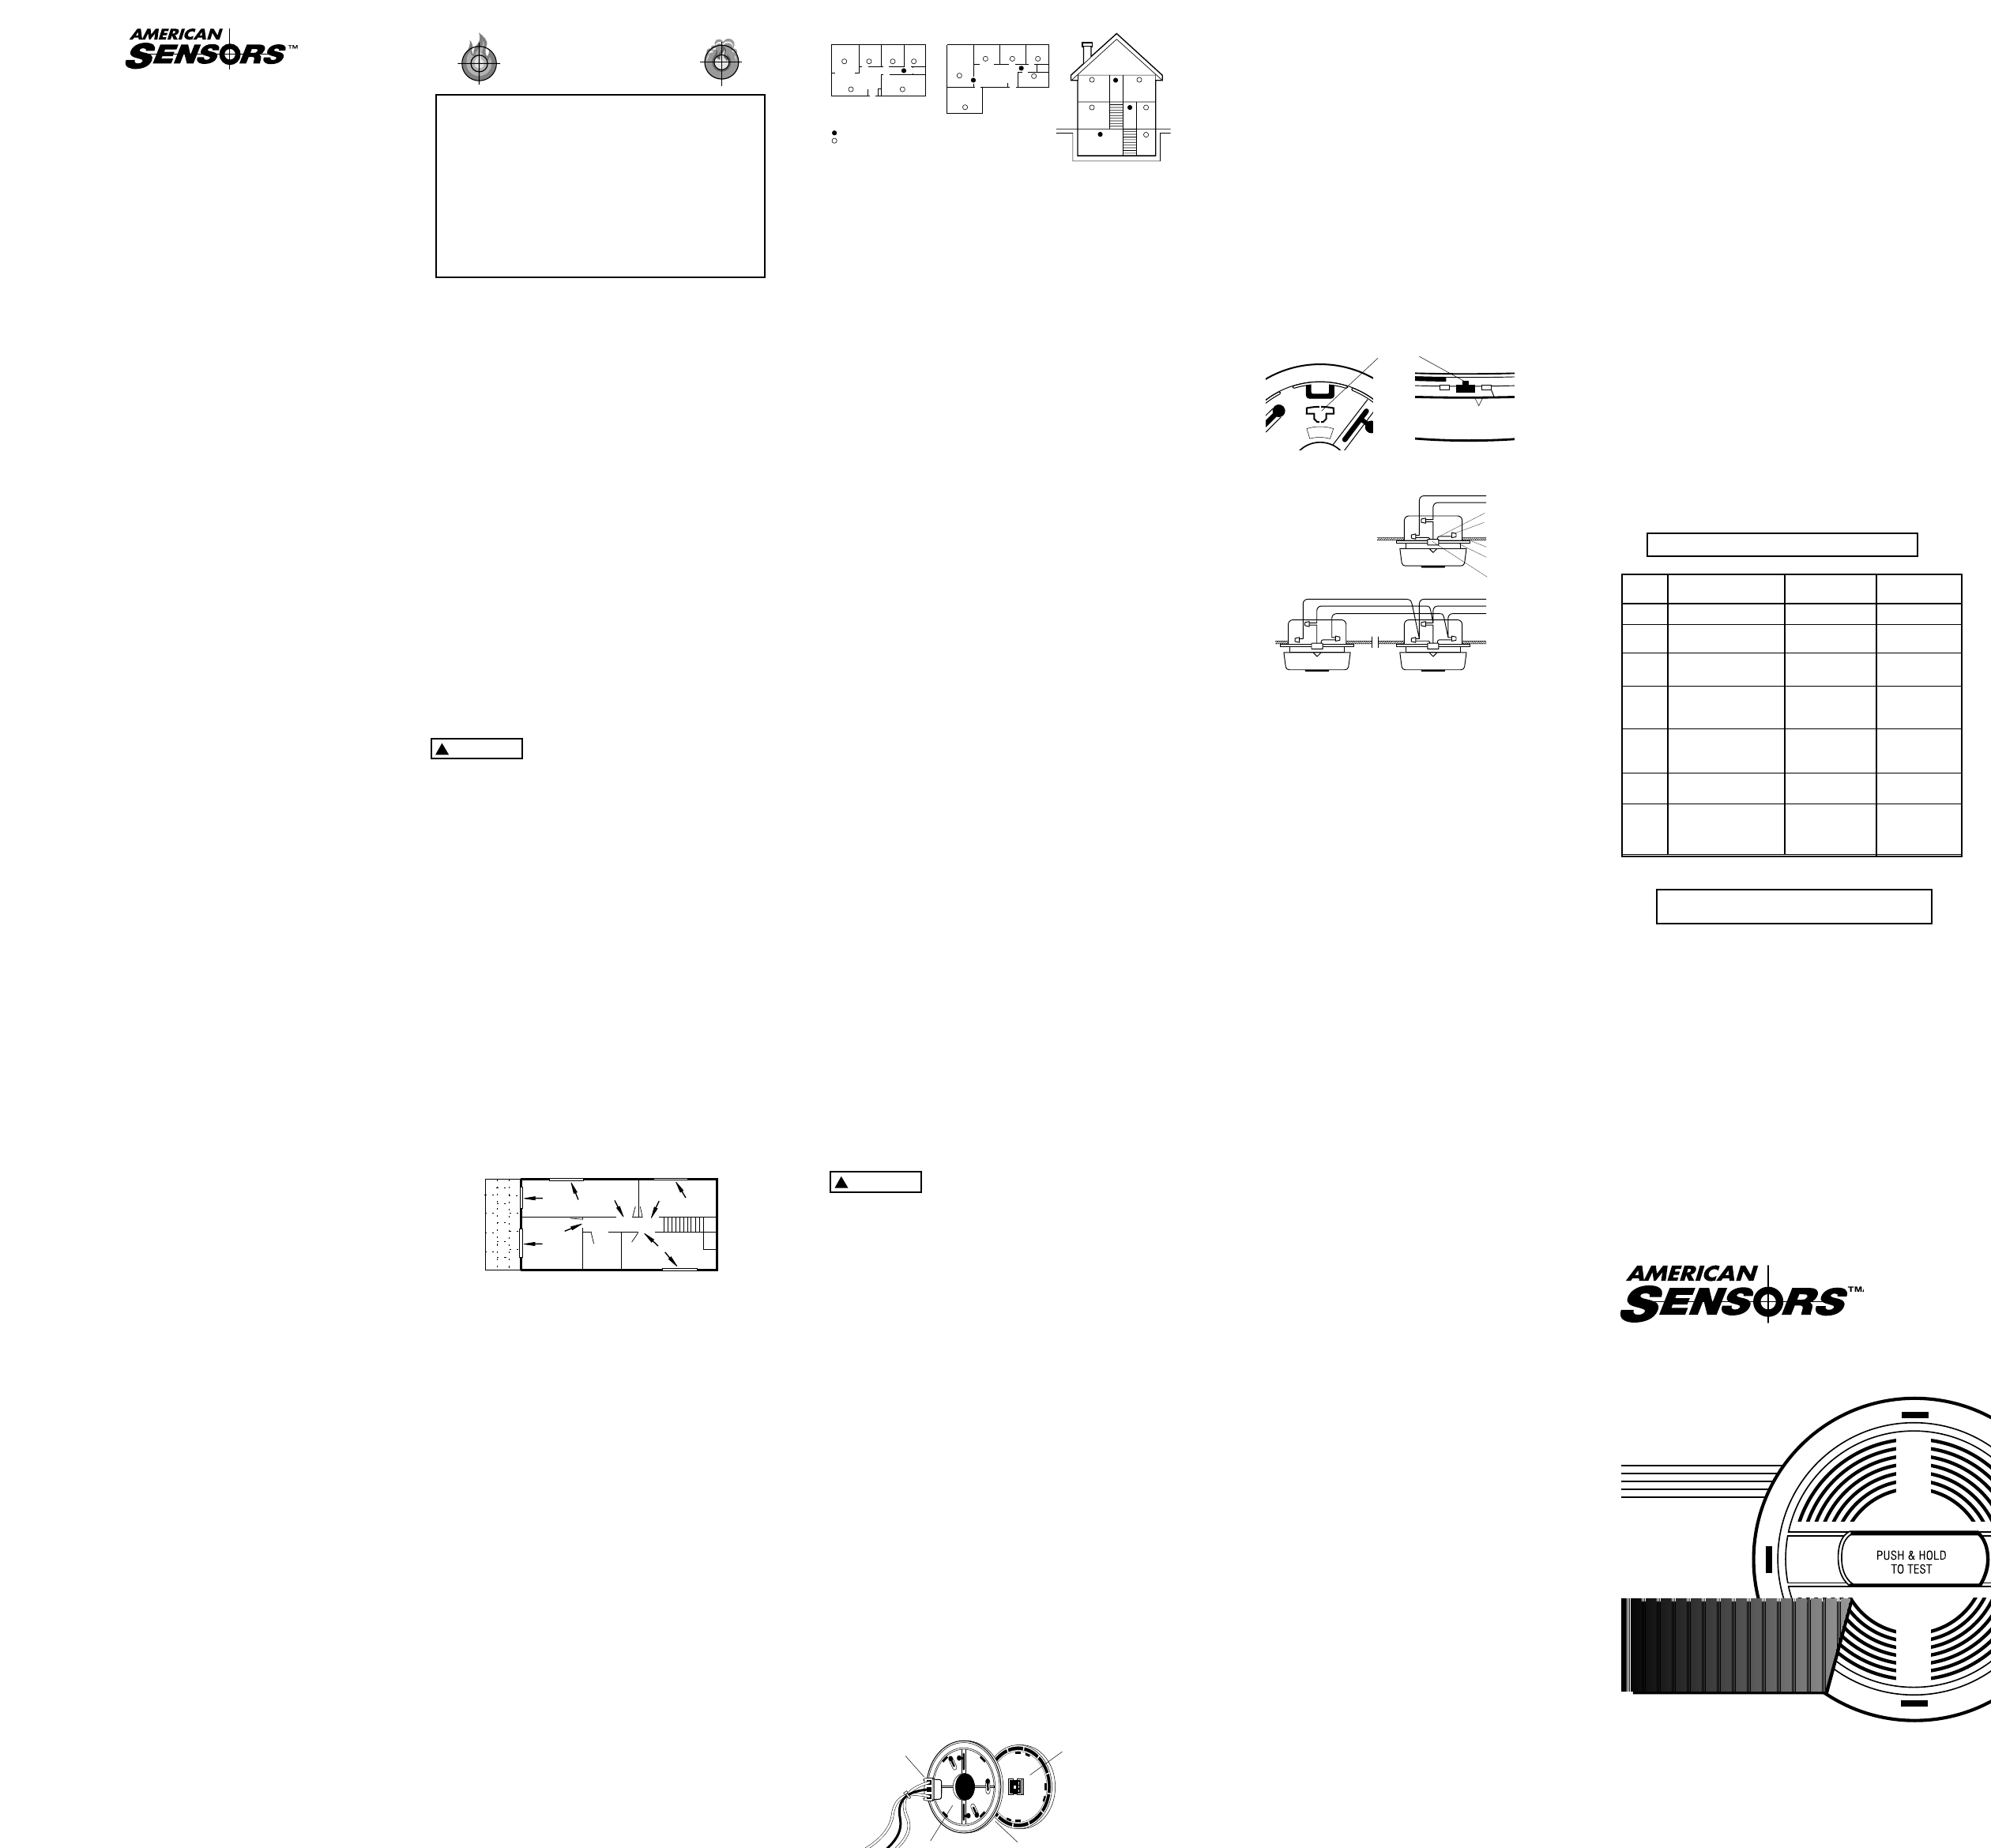
3a. WHERE TO LOCATE SMOKE ALARMS
As a minimum, smoke alarms should be located between sleeping
areas and potential sources of fire such as a kitchen, heated garage or
basement. In single storey homes with one sleeping area, an alarm
should be installed in the hallway outside the bedrooms (see Figure
1). In single storey homes with two separate sleeping areas, a
minimum of two alarms are required, one outside each sleeping area
(see Figure 2). In multi-level or split-level homes, as a minimum, an
alarm should be installed outside each sleeping area, in the basement
and at every level of the home (see Figure 3).
€ In every room of your home (except the bathroom): Research
indicates that substantial increases in warning time can be obtained
with each properly installed, additional alarm.
€ In bedrooms: In anticipation of fires originating within these rooms,
caused by faulty wiring, lamps, appliances, smoking or other hazards.
€ In hallways: At a distance no greater than 13 feet (4 meters) from
the farthest wall and no greater than 26 feet (8 meters) from the
next alarm.
€ In the center of a room or hallway: As it is impossible to predict the
source of a fire. If it is necessary to place the alarm on a wall, always
locate the top of the smoke alarm 4-6 inches (10-15 cm) from the
ceiling.
€ As needed: To compensate for closed doors and other obstacles that
may interfere with the path of smoke to an alarm. T hey may also
prevent occupants on one side of a closed door from hearing a alarm
on the other side of the door.
€ Model SA360 - Professional Multi-Location model can be located
in any area of the home.
READ •CAPABILITIES AND LIMITATIONS OF SMOKE
ALARMSŽ in Section 1 of this manual.
Your local fire department or insurance company may be able to give
you further advice on the best smoke alarm locations in your home.
Call them and ask.
T here are two different types of smoke alarm technology
currently in general use: ionization and photoelectronic. While
both types of technology are suitable for general residential use,
an ionization alarm will normally respond faster to fast flaming
fires, while a photoelectronic alarm may be more sensitive to
detecting slow smoldering fires. Because home fires develop in
different ways and are often unpredictable in their growth, it is
impossible to predict which type of alarm will provide the earliest
warning. For best home protection install at least one
photoelectronic and one ionization smoke alarm on each level of
your home. Model SA360 is an ionization type smoke alarm.
Ionization Technology vs.
Photoelectronic Technology
Smoke Alarms
3b. WHERE TO LOCATE SMOKE ALARMS IN MOBILE HOMES
NOT E: Power supply must be 120 Volts AC for model SA360.
In mobile homes built after 1978 locate the smoke alarm as
described above.
Older mobile homes may have little or no insulation compared to
the ones built post 1978. These uninsulated exteriors can disrupt
airflow around the smoke alarm in hotter or colder weather. Locate
the alarm only on interior walls 4Ž to 6Ž (10 to 15 cm) from ceiling
1. if you own an older mobile home or 2. if you notice the exterior
walls and/or ceiling are noticeably cold or warm or 3. if you are
uncertain about the quality of insulation.
Regardless of the age of the mobile home, locate alarms throughout
to ensure maximum protection. Follow the location instructions in
this manual.
4. NFPA RECOMMENDATIONS
For your information, the National Fire Protection Association•s
Standard 72 reads as follows:
2-2.1.1.1
Smoke alarms shall be installed outside of each separate sleeping
area in the immediate vicinity of the bedrooms and on each
additional storey of the family living unit, including basements and
excluding crawl spaces and unfinished attics. In new construction a
smoke alarm also shall be installed in each sleeping room.
A-2.5.2.1 Smoke Detection- A re More Smoke Alarms Desirable? T he
required number of smoke alarms might not provide reliable early
warning protection for those areas separated by a door from the
areas protected by the required smoke alarms. For this reason, it is
recommended that the householder consider the use of additional
smoke alarms for those areas for increased protection. The
additional areas include the basement, bedrooms, dining room,
furnace room, utility room, and hallways not protected by the
required smoke alarms. The installation of smoke alarms in
kitchens, attics (finished or unfinished), or garages is not
normally recommended, as these locations occasionally
experience conditions that can result in improper operation.
5. LOCATIONS TO AVOID
Av oid locations where smoke may not reach the alarm in time to
provide early warning, or where the alarm may not be effective.
DO N OT PLACE SMOKE ALARMS:
€ In turbulent air from fans, doors, windows, etc. The rapid air
movement may prevent combustion particles from entering the
alarm.
€ In dead air spaces such as at the peak of an •AŽ frame ceiling.
•Dead airŽ at the top may prevent smoke from reaching the alarm
in time to provide early warning. In rooms with simple sloped,
peaked or gabled ceilings, install smoke alarms on the ceiling
3 feet (90 cm) from the highest point of the ceiling.
Note: For complex ceiling structures, consult a safety expert for
the number of alarms required and the best locations.
€ In very hot or cold areas where the temperature exceeds 100
0
F
(38
0
C) or falls below 40
0
F (5
0
C).
€ Less than 6 inches (15 cm) from the wall when mounted on the
ceiling.
Nuisance alarms could result when smoke alarms are located where
interference may occur with the sensing chamber. T o avoid nuisance
alarms, DO NOT place smoke alarms:
€ In high humidity areas such as bathrooms and attics. Place smoke
alarms at least 10 feet (3 meters) away from bathrooms.
€ In insect-infested areas.
€ In poorly ventilated kitchens or garages.
€ In very dusty and dirty areas.
€ Near fluorescent lights. Place smoke alarms at least 5 feet
(1.5 meters) from fluorescent lights.
This smoke alarm is suitable for residential
use. It is not to be connected to a commercial
or industrial fire alarm panel.
6. INSTALLATION AND TESTING
This model has an optional Locking Key to better secure the alarm
to inhibit unauthorized removal. If securing the alarm is a concern,
remove and save the •Locking KeyŽ from the back plate with needle
nosed pliers before installing the alarm. See point 12 in this section
for more details on this feature.
A. Installation
Mount to any standard or rectangular junction box with a minimum
depth of 1 inch (2.5 cm). 120V AC, 55mA operation.
WARNING: Wiring should only be installed by a licensed
electrician in accordance with the National Electrical Code and
local codes.
WA RNING: The circuit used to power the smoke alarm must be a
24 hour voltage circuit that cannot be turned off by a switch or a
ground fault interrupter. It is highly recommended that smoke alarms
be wired on a separate circuit (one with no other lights or
appliances) to ensure maximum reliability of AC power supply. For
installation of smoke alarms in Dwelling Units, it is important to
follow the National Electrical Code and local codes.
1. Electricity must be turned off at service entrance before
beginning installation to prevent electrical shock or equipment
damage.
2. Location must comply with applicable building codes.
3. Install a junction box where you plan to install the alarm. Use
standard 14 gauge wire.
4. Connect black and white wires color to color from power
connector to AC power leads.
5. For multiple station application use the orange wire to
interconnect. If unit is not to be interconnected, cap unused
wire. NOT E: The SA360 is interconnectable with up to 11
other units.
6. Loosen or remove screws from junction box.
7. Attach flat side of mounting plate and tighten screws to fit
snugly against the junction box and ceiling or wall.
8. Bring power connector through center opening.
9. Slip the paper gasket supplied with the alarm over the power
connector and then onto the mounting plate so that the four
plastic tabs on the mounting plate will hold the gasket in place.
The gasket will prevent downward air currents from entering the
smoke alarm through holes in the back of the alarm, unless
blocked off, downward air currents could prevent smoke from
entering the alarm. WARNING: IT IS IMPERATIVE THAT
YOU INSERT THE GASKET WHEN INSTALLING YOUR
SMOKE ALARM.
10. Align the plug area on the smoke alarm with the cutout in the
gasket and place the smoke alarm on the mounting plate, turn
clockwise to fasten it to the mounting plate.
11. Plug wire connector into the back of the alarm.
12. If auxiliary lock is desired, insert the Locking Key into the slot
in the base of the alarm. Locking Key should •clickŽ into
position and be flush with the alarm housing. CAUTION: Do
not attempt to remove alarm without first removing the Locking
Key. If the key is not first removed, damage may result. To
remove, use a screwdriver and gently pry the Locking Key loose.
13. Test alarm operation after installation in accordance with
•Operation: How to TestŽ instructions.
Note: Maximum interconnect wiring length is 150 feet (50 meters).
IMPORTANT: The SA360 is not interconnectable with any other
model produced by another manufacturer. The SA360 may be
interconnected only with the following Underwriters• Laboratories
Inc. listed smoke alarm models:
American Sensors SA379
American Sensors SA360
ASI Electronics (American Sensors) ESA5010/ESA5011
Dicon Safety Products Inc. 670L/LR
Dicon Safety Products Inc. 370LBX
Note: This equipment should be installed in accordance with the
National Fire Protection Association Standard 72. (National Fire
Protection Association, Batterymarch Park, Quincy, MA 02269).
B. Testing After Installation
1. Check to see that the green •POWER ONŽ light is on. The
•POWER ONŽ light is visible behind the slotted case and
confirms that the smoke alarm is receiving AC power.
2. Press and hold the test button until the alarm sounds. NOTE: It
may be necessary to press the test button for up to 20 seconds for
an alarm to sound. An alarm is indicated by 3 loud beeps
repeating every 5 seconds. Alarm may continue to sound for up
to 10 seconds after button is released.
3. At least once a week, press the test button and hold until the
alarm sounds, then release.
NOTE: Multiple Station Only:
4. Test each alarm separately in the system.
5. Determine that the initiating alarm triggers other alarms in the
system.
7. MAINTENANCE & TROUBLESHOOTING
TEST THE ALARM WEEKLY. VACUUM EVERY SIX MONTHS.
Your smoke alarm should be cleaned every six months to help keep
the unit working efficiently. REMOVE POWER T O ALARM.
Gently vacuum through the vents of the alarm with a soft brush
attachment. Keep vacuum nozzle from touching the unit.
RE-ESTABLISH POWER TO ALARM.
Problems may be indicated by the following:
1. The alarm does not sound upon pressing the test button.
2. The green operating light does not remain steadily on when unit
is AC powered.
3. The red operating light remains steadily on or off. (i.e. does not
flash once every 45 seconds, when the unit is not in alarm).
Try the following:
1. Inspect breaker or fuse in power circuit to alarm.
2. Gently vacuum as recommended above.
3. Call an electrician to inspect house wiring and connection to
alarms.
If these procedures do not correct the problem, do NOT attempt
repairs. If the smoke alarm is within warranty period and terms,
indicate the nature of the problem and return the unit with proof of
purchase to the point of purchase, distributor or manufacturer. See
below for instructions. Units beyond warranty cannot be
economically repaired.
FALSE ALAR MS:
Abnormal air conditions may cause the highly sensitive smoke alarm
to give a •falseŽ alarm. If no fire is apparent, ventilate the room
and/or blow fresh air into the unit until the alarm stops. Once
cleared, the smoke alarm will automatically reset.
DO NOT DISCONNECT THE AC POWER SUPPLY.
Dust can lead to excess sensitivity. Vacuum as recommended above.
DO NOT PAINT THE UNIT.
8. LIMITED WARRANTY
Your American Sensors SA360 smoke alarm is warranted for ten
years from the date of purchase against defect in material and
workmanship. Units returned to Dicon Global Inc.
with proof of purchase date during this period as a result of such
defects will be repaired, or replaced at Dicon Global Inc.s
. •option, without charge. This warranty only covers defects in
material or workmanship in normal residential use. This warranty
does not cover damage resulting from negligent handling, misuse, or
lack of reasonable care. This warranty is in lieu of any other
warranty either expressed or implied.
DICON GLOBAL INC. SHALL HAVE NO
LIABILITY FOR ANY PERSONAL INJURY OR PROPERTY
DAMAGE, OR ANY SPECIAL INCIDENTAL, CONTINGENT
OR CONSEQUENTIAL DAMAGE OF ANY KIND RESULTING
FROM A FIRE. THE EXCLUSIVE REMEDY FOR BREACH OF
THE LIMITED WARRANTY CONTAINED HEREIN IS THE
REPAIR OR REPLACEMENT OF T HE DEFECTIVE PRODUCT
AT DICON GLOBAL INC.S OPTION IN NO
CASE SHALL DICON GLOBAL INC.S
LIABILITY UNDER ANY OTHER REMEDY PRESCRIBED BY
120 VAC -IO NIZA T ION
SM OKE AL A RM
R E AD CARE FULLY AND SAVE.
This manual contains important information.
A copy of this manual must be left with the end user.
2502-2509 (REV-1)
LAW EXCEED THE PURCHASE PRICE. YOUR SMOKE
ALARM IS NOT A SUBSTITUTE FOR PROPERTY,
DISABILITY, LIFE OR OTHER INSURANCE OF ANY KIND.
APPROPRIATE COVERAGE IS YOUR RESPONSIBILITY.
CONSULT YOUR INSURANCE AGENT.
This warranty gives you specific legal rights and you may have other
rights which may vary from state to state.
Units may be returned to point of purchase according to
retailers exchange / return policy. Or call 1-800-387-4219, for
shipping instructions and a returned goods authorization number
•RGAŽ number, to return to Dicon Global Inc.
Returned goods must be shipped prepaid. A cheque for $5.00 is
also required for return postage
. Please mark the •RGAŽ number
on the exterior of your package. Date code located on back of smoke
alarm.
Dicon Global Inc.
20 Steelcase Road, Unit 3
Markham, Ontario,
Canada L3R 1B2
9. AMERICAN SENSORS PRODUCTS
American Sensors offers a complete line of smoke alarms. Select
from this group of quality products to ensure your home is fully
protected in case of fire.
WA RNING
!
Smoke alarm
paper gasket (not shown-fits in between)
mounting plate
quick disconnect
power connector
BLACK
120VAC, 60Hz
WHIT E
Cap Unused Wire
Twist Connectors
Ceiling
Mounting Plate
Supplied Gasket Must Be
Installed In Mounting P late
Quick Disconnect
Power Connector
BLACK
120VAC, 60Hz
WHIT E
ORANGE Interconnect
MODEL SA360
120VAC Dual-Ionization
Interconnectable
Smoke Alarm
MULTIPLE STATION
Smoke Alarm
Outlet Box
SINGLE S TATION
M ODE L
SA360
T o Use Optional Locking Key-
Remove from mounting plate with needle nosed pliers and insert in housing