


OWNER'S MANUAL
LP401, LP401A
(12 Volt DC)
LP405, LP405A
(12 Volt AC)
Propane Gas Detector
(12 Volt Hard-Wired with Optional
Relay Output)
Introducing the LP401, LP401A,
LP405, LP405A Propane Gas
Detector
The LP401, LP401A, LP405, LP405A Propane
Gas Detectors are effective products for
detecting any build-up of propane gas in your
home. Dicon Global Inc., the maker of these
propane gas detectors, has been developing
and making products for detecting gases since
1985.
Your new detector:
Is easy to install
Monitors for propane gas continuously
and sounds a loud (85db) alarm when it
detects a build-up of propane gas.
Has a Test button so that you can test it
at any time.
Tests itself continuously
Is listed by Underwriters Laboratories to
UL1484 standard
Has a 5-year guarantee for the propane
gas sensing element.
A. Why should you be concerned
about propane gas?
Propane gas is a colorless, flammable gas that
can be explosive if it escapes and builds up.
Propane is stored as a liquid under pressure,
so most likely sources of leaks are in the con-
nections to propane tanks for propane-pow-
ered heaters, stoves, refrigerators, furnaces,
and barbecues. When propane leaks, it
becomes a gas and can be ignited by a spark
or flame.
B. Where should you install the
detector?
Propane gas is heavier than air and therefore
collects in the lowest areas of rooms and
homes. To detect a dangerous concentration
of propane gas, you should place your detec-
tor near a propane appliance. You should also
place detectors on floors that are below the
floor with a propane appliance. For example,
a leak in a kitchen can create a build-up of
propane in the basement.
You should install your detector as close to the
floor as possible.
C. How should you install the
detector?
You must install the LP401, LP401A, LP405,
LP405A Propane Gas Detector on a wall as
close to the floor as possible.
To install the detector:
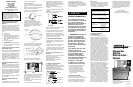
1. At the place where you are going to install
the detector, draw a horizontal line four inches
long.
2. Place the circular mounting plate so that the
square holes are aligned on the line.
3. In each of the circular slots. Draw a mark to
locate a mounting plug and screw.
4. Remove the mounting plate.
5. Using the appropriate size drill, drill two
holes at the marks and insert wall plugs.
6. Using the two screws and wall plugs (all
supplied), attach the mounting plate to the wall
ensuring that the cord slot in the mounting
plate is down.
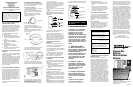
7. Slide the detector onto the mounting plate
so that the two arms on the mounting plate fit
into two slots in the back of the detector.
8. Ensure that the detector's 12 Volt wires
are located in the cord slot or behind the
detector in an appropriately recessed area.
9. Give the detector a short counter-clockwise
twist to lock the detector in place. If the detec-
tor is not horizontal, you can remove it, re-
adjust the mounting plate, and re-install it until
it is horizontal.
10.Connect the 12 Volt source using the two
connectors supplied.
11. (Models LP401A and LP405A only) con-
nect the three relay output wires (from the
back of the detector) using the connectors
supplied. The relay output wires have the fol-
lowing connections and are labeled as such:
the black wire is common
the red wire is from the normally-open
contact.
the green wire is from the normally-closed
contact
Note: Steps 10 and 11 must be preformed by
qualified service personnel only.
Ensure that any wires not connected are insu-
lated with a connector (supplied).
Wait for ten minutes before you test the detec-
tor. During that time, the alarm may sound
several times and the yellow (malfunction)
lights may light up once or twice as the detec-
tor cleans the sensor. This will also occur if the
power to the detector is interrupted.
D. How can you test the detector?
To test the detector, wait at least ten minutes
after installing it, press the test button. The
alarm sounds.
To reset the alarm, turn the 12 Volt supply off,
wait ten seconds, then turn it on again.
The detector continually checks itself. If it finds
a malfunction, it lights the yellow light. If this
occurs, call Dicon Global Inc. at 1-800-387-
4219.
E. How can you maintain your
detector?
A detector is only useful if it works. To keep it
working, all you need to do is:
vacuum the air vents occasionally to
keep them free of dust.
test the detector by pressing the test
button once a month.
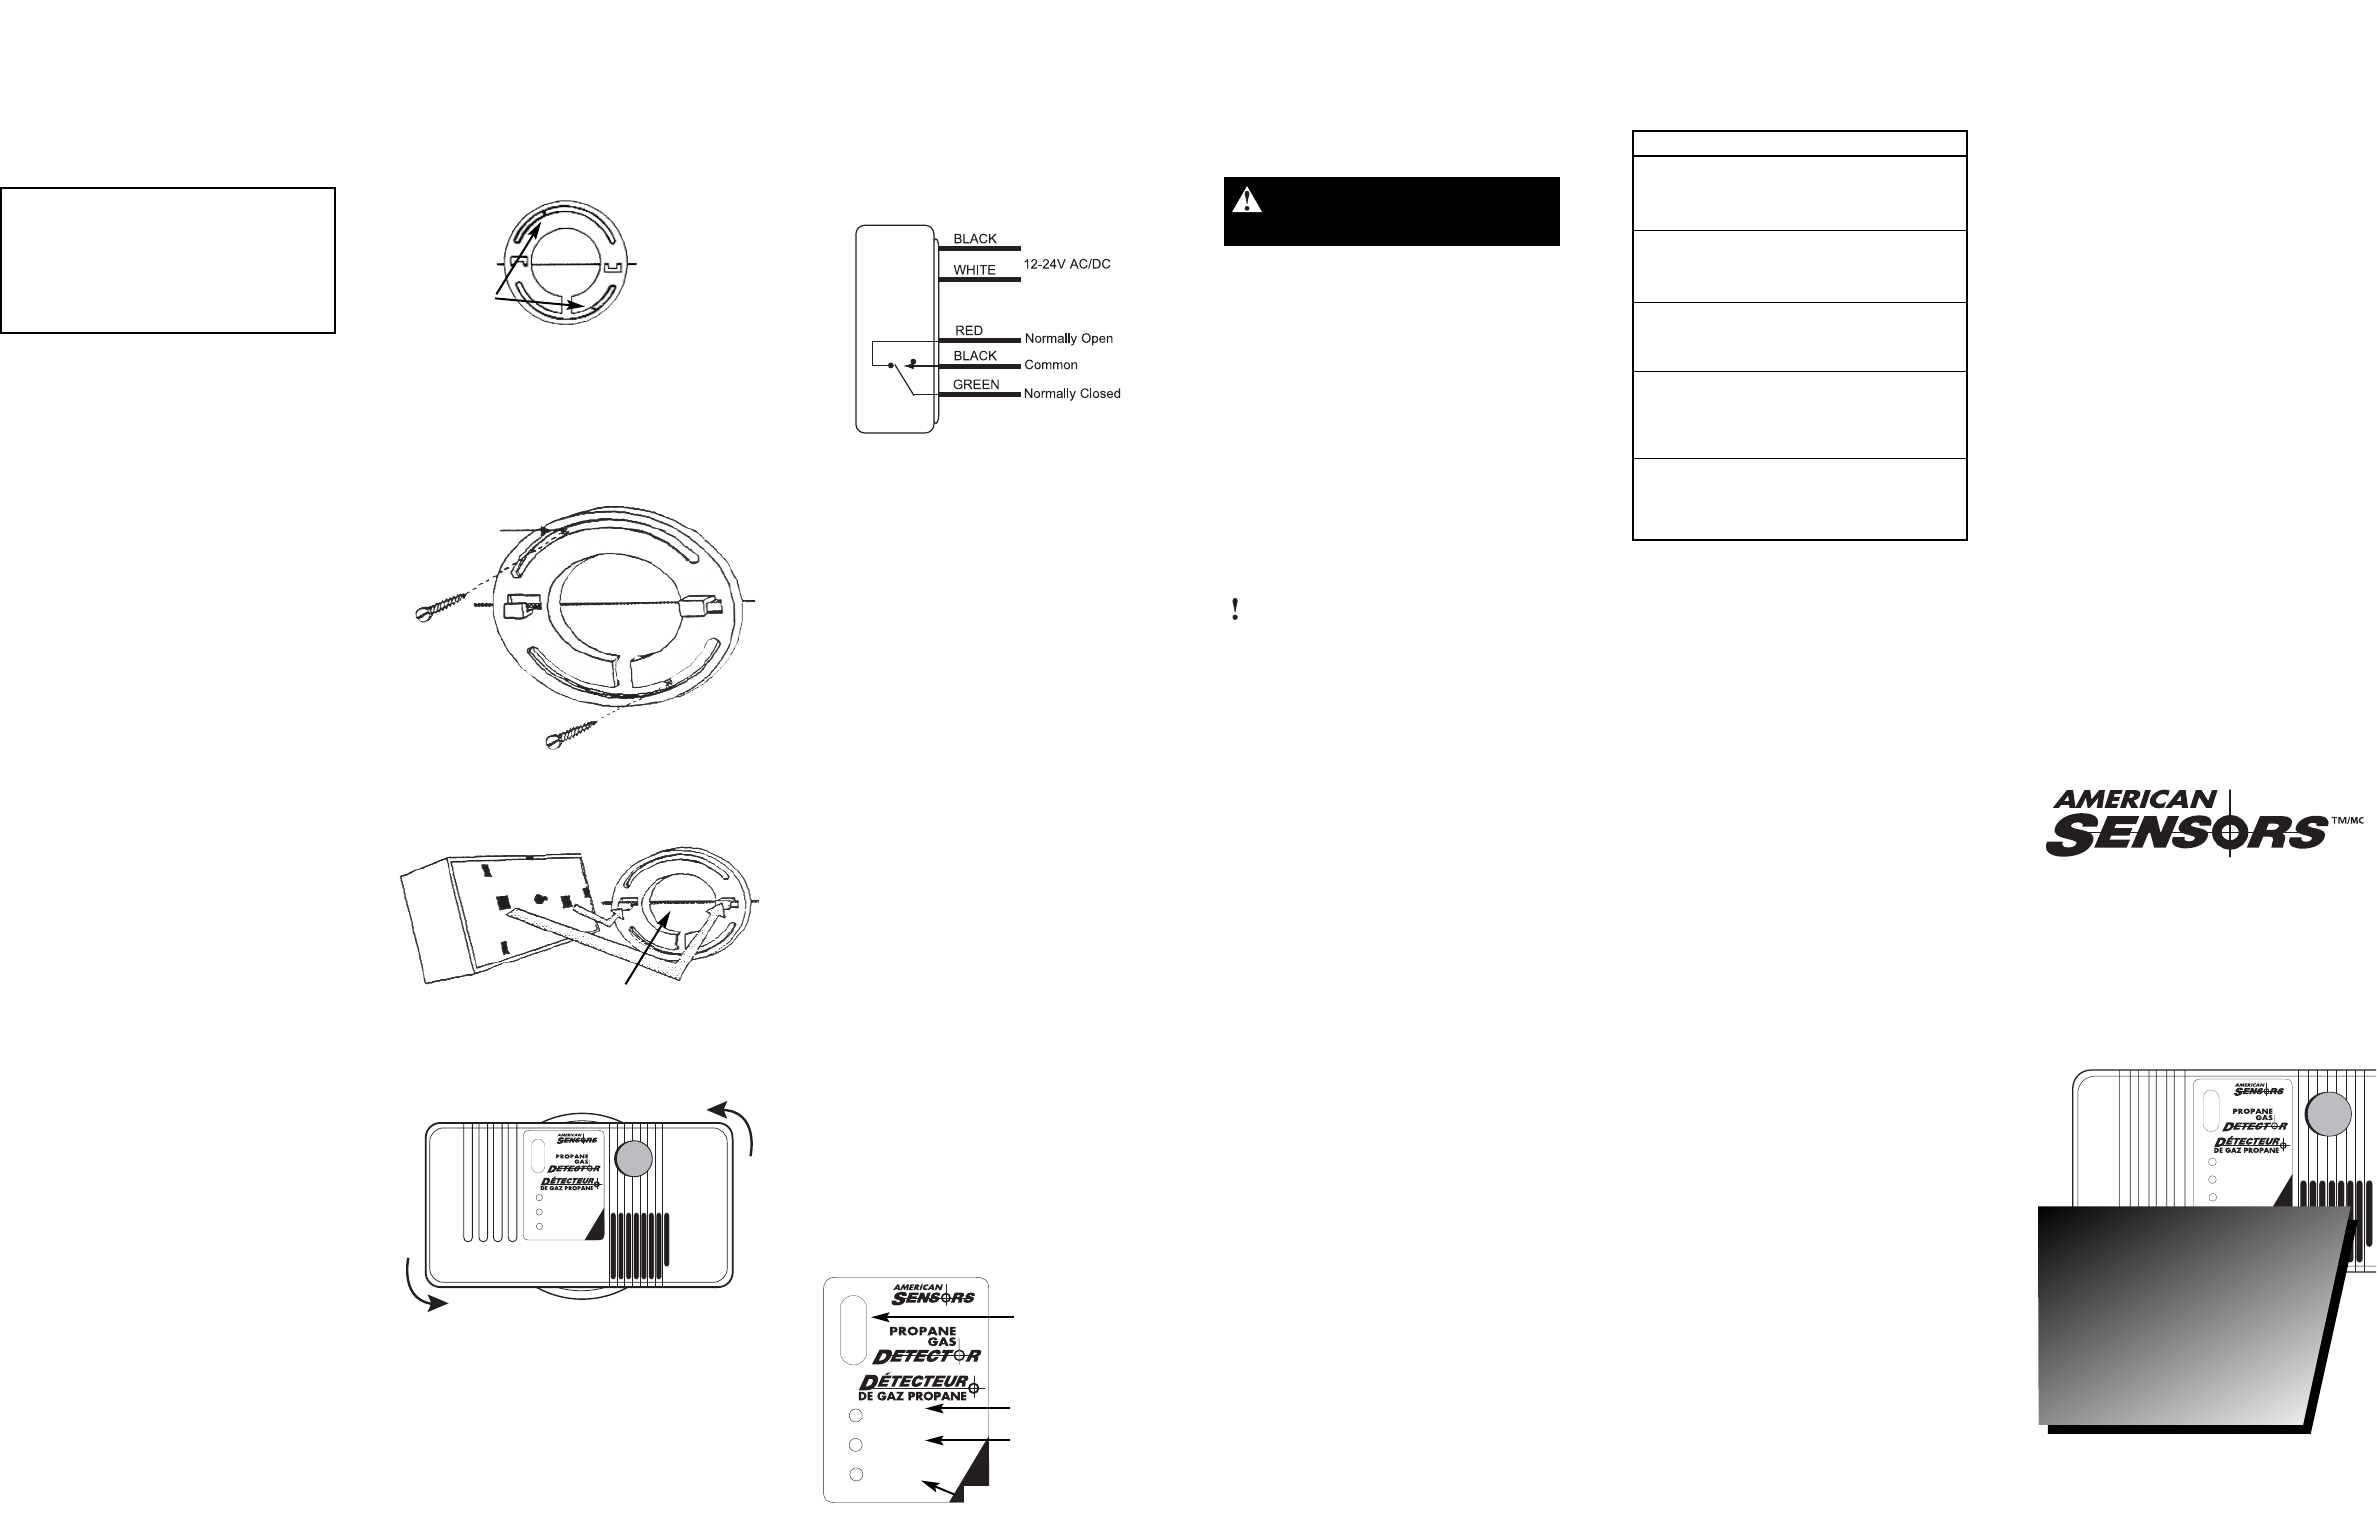
F. What do the lights mean?
The detector has three lights:
Green (Power) light: This lights up when the
detector has power. It is normal for this light to
be on while the detector is powered.
Red (Alarm) light: This lights up when the
alarm sounds. It is normal for this light to turn
on when you press the Test button.
Yellow (Malfunction) light: This lights up
when a detector finds a malfunction while it is
checking itself. It is normal for this light to turn
on once or twice after you power the detector
or after a power failure.
EVACUATE IMMEDIATELY!
Do a head count to check
that everybody is accounted
for. Call the nearest fire
department and ask them to
determine the source of
propane gas. Do not re-enter
the premises until the prob-
lem has been corrected and
the propane gas has been
dispersed.
WARNING: Activation of
this device indicates the
presence of propane gas,
which is flammable and can
be fatal. The source of the
gas may be an object such
as a furnace, a hot water
heater or other propane gas
appliances.
This detector will only indi-
cate the presence of
propane gas near the detec-
tor. Propane gas may be
present in other areas.
Correction of the problem
may require the services of a
local propane gas utility
company or contractor.
H. What do you do after the
problem has been corrected?
On re-entering the premises after an alarm:
1. Turn the 12 Volt supply off for ten
seconds, and then turn it on again.
2. After ten minutes (during which the
alarm may sound once or twice and
the yellow light may flash), test the
detector to make sure that the detector
is working properly.
I. Technical Information
Your LP401, LP401A, LP405, LP405A
Propane Gas Detector uses a sensing technol-
ogy that enables the detector to sound an
alarm before concentration of gas reaches
25% of the Lower Explosive Limit (LEL).
Exposure times
The propane gas concentrations standard for
the alarms has been set by the Underwriters
Laboratories Inc. to be less than 25% of the
LEL.Therefore your unit will alarm immediately,
upon detection of dangerous levels.
J. Warranty Information
Limited Warranty
Dicon Global Inc. warrants its enclosed
Propane Gas Detector sensor to be free from
defects in material and workmanship under
normal use and service for a period of five (5)
years form date of purchase. Dicon Global Inc.
warrants it's enclosed Propane Gas Detector
other than the sensor to be free from defects
in materials and workmanship under normal
use and service for a period of one (1) year
from date of purchase. Dicon Global Inc.
makes no other express warranty for this
Propane Gas Detector. No agent, representa-
tive, dealer or employee of the company has
the authority to increase or alter the obliga-
tions or limitations of this Warranty. The com-
pany's obligation of this warranty shall be limit-
ed to the repair or replacement of any part of
the detector which is found to be defective in
materials or workmanship under normal use of
service during the first year period commenc-
ing with the date of purchase except for the
sensor which is warranted during the five year
period commencing with the date of purchase.
During the latter four (4) years of the warranty
period, such repairs or replacements other
than the sensor itself, shall be made at a
charge to the customer not to exceed the man-
ufacture's cost. Units in need of repair should
be returned to Dicon Global Inc. prepaid.
Please call 1-800-387-4219 for shipping
instructions. The company shall not be obligat-
ed to repair or replace units which are found to
be in need of repair because of damage,
unreasonable use, modifications, or alterations
occurring after the date of purchase. The dura-
tion of any implied Warranty, including that of
merchantability or fitness for any particular
purpose, shall be limited to the period of one
(1) year on the detector and five (5) years on
the sensing unit commencing with the date of
purchase. In no case shall the Company be
liable for any consequential or incidental dam-
ages for breach of this or any other warranty
expressed or implied whatsoever, even if the
loss or damage is caused by the Company's
negligence or fault. Some states do not allow
the exclusion or limitation or incidental or con-
sequential damages, so the above limitations
or exclusion may not apply to you. This war-
ranty gives you specific legal rights, and you
may also have other rights which vary from
province to province.
Dicon Global Inc.
20 Steelcase Road West, Unit 3
Markham, Ontario, Canada L3R 1B2
IMPORTANT: NOT SUITABLE AS A CAR-
BON MONOXIDE DETECTOR OR A
SMOKE OR FIRE DETECTOR. THIS
DEVICE IS NOT SUITABLE FOR INSTAL-
LATION IN A HAZARDOUS LOCATION, AS
DEFINED IN THE NATIONAL OR CANADI-
AN ELECTRICAL CODE.
G. What should you do if the
ALARM sounds?
Specifications
Power Supply Input Ratings
Models LP401 and LP401A: 12V DC, 600mA
Models LP405 and LP405A: 12 V AC, 600 mA
Optional Relay Output Ratings
Models LP401A and LP405A: class 2 output only
30 V DC 1 A
Dimensions: 6.5” x 3.5” x 1.375”
16.5cm x 8.9cm x 3.5cm
Normal Operating Conditions:
Temperature: 4.4°C (40°F) to 37.8°C (100°F)
Gas Detection Level: less than 25% LEL
of propane gas
Lights: Power (green)
Alarm (red)
Malfunction( yellow)
P
ROPANE
G
AS
D
ETECTOR
D
ÉTECTOR DE
G
AZ
P
ROPANE
Power
Alimentation
Alarm
Alarme
Malfunction
Défaillance
Test/Essai
TM MC
IMPORTANT: This manual must be read, followed and
kept for future reference.
IMPORTANT: ce guide doit être lu, suivi et gardé en lieu
sur pour consultation ultérieure.
(Français au verso)
Drilled hole,
plugged
Screw hole
mark
Horizontal line
Horizontal line
Power
Alimentation
Alarm
Alarme
Malfunction
Défaillance
Test/Essai
TM MC
Power
Alimentation
Alarm
Alarme
Malfunction
Défaillance
Test/Essai
TM MC
Test Button
Power LIght - Green
Alarm Light - Red
Malfunction Light - Yellow
Horizontal line
2502-A0065
Owner’s Manual / Guide d’utilisation
Models / Modèles LP401 and LP401A
12 V DC / 12 V c.c.
Models / Modèles LP405 and LP405A
z12 V AC / 12 V c.a.
Models LP401A and LP405Aare equipped
with a Calss 2, 30V DC/1A realy output
Les modèles LP401A et LP405Asont fournis
avec un relais de sortie de 30 V c.c./1 A
de classe 2